Chocolate Cake Pops Recipe
Introduction
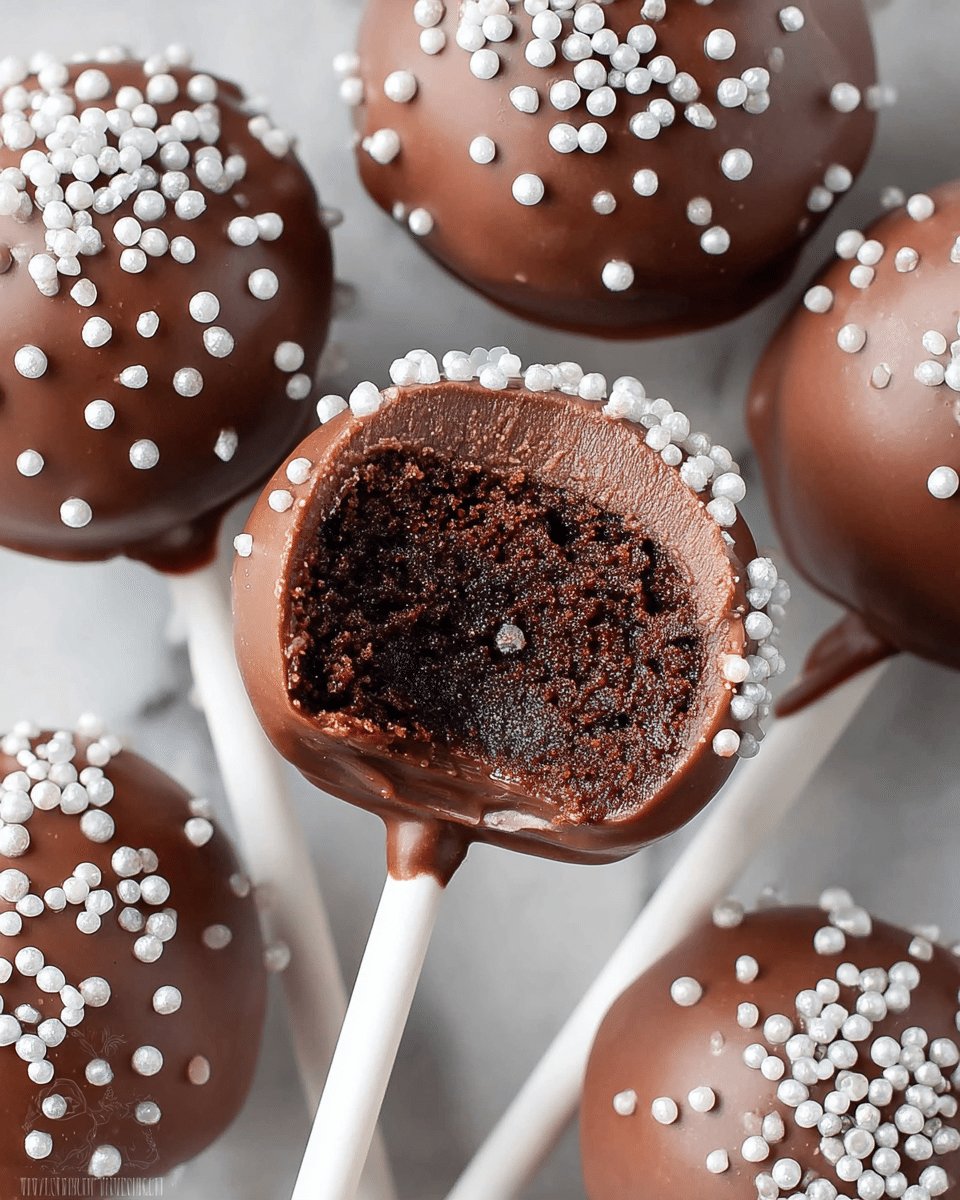
Chocolate cake pops are a fun and delicious treat that’s perfect for parties or anytime you want a bite-sized indulgence. These rich, chocolatey bites combine moist cake with creamy frosting, all coated in a smooth chocolate shell and decorated with sprinkles.
Ingredients
- 15 oz box chocolate cake mix
- 1/3 cup vegetable oil
- 3 eggs
- 1 1/4 cup water
- 2 tbsp Pillsbury creamy supreme chocolate fudge frosting
- 12 oz Wilton chocolate candy melts (brown) (1 bag)
- 1 teaspoon melting aid
- 1 bottle white nonpareils
Instructions
- Step 1: In a large bowl, combine the chocolate cake mix, water, vegetable oil, and eggs. Use an electric hand mixer to blend all ingredients thoroughly.
- Step 2: Spray a 9×13 inch baking pan with non-stick spray, pour in the batter, and bake at 350°F for 30-35 minutes.
- Step 3: Carefully flip the cake onto a cooling rack and allow it to cool completely.
- Step 4: Using a knife, remove the entire dry outer layer of the cake to avoid crumbly pops.
- Step 5: Crumble the trimmed cake into a large bowl, breaking it down into fine crumbs.
- Step 6: Add about 2 tablespoons of chocolate fudge frosting to the crumbs and mix well using clean hands.
- Step 7: Roll the mixture into balls and compress each one using a cake pop former or meat baller for uniform size.
- Step 8: Roll the balls by hand once more to smooth out any weak lines that might cause them to break.
- Step 9: Melt about 1/4 cup of the chocolate candy melts in a small bowl in 10-second intervals until smooth.
- Step 10: Dip the end of each cake pop stick into the melted chocolate and insert halfway into each cake ball.
- Step 11: Freeze the assembled cake pops for 15 minutes to secure the sticks, but do not exceed 15 minutes.
- Step 12: Melt the remaining chocolate candy melts in a large bowl, stirring in 1 teaspoon of melting aid to thin the coating.
- Step 13: Pour the melted chocolate into a cup and dip each cake pop carefully without swirling. Lift straight up.
- Step 14: Hold the dipped cake pop at a 45-degree angle and tap your wrist gently to remove excess chocolate. Immediately sprinkle white nonpareils on top, catching extras in a large bowl below.
- Step 15: Place the cake pops upright in a styrofoam block and let them set at room temperature for about 30 minutes before serving.
Tips & Variations
- Removing the dry outer layer of the cake ensures your cake pops hold together better and have a softer texture.
- Add a teaspoon of melting aid to candy melts to achieve a smoother, thinner coating that’s easier to dip and decorate.
- Using a cake pop former helps create uniform balls, but hand-rolling can smooth out any cracks or lines afterward.
- For a fun twist, try using colored candy melts or adding different sprinkles instead of white nonpareils.
Storage
Store cake pops in an airtight container at room temperature for up to 3 days. For longer storage, keep them in the refrigerator for up to a week. Before serving, allow refrigerated pops to come to room temperature to soften the coating. Avoid freezing as it can affect texture and decoration.
How to Serve

Serve this delicious recipe with your favorite sides.
FAQs
Can I make cake pops gluten-free?
Yes, by using a gluten-free chocolate cake mix and ensuring other ingredients like frosting and candy melts are gluten-free, you can easily make gluten-free cake pops.
Why are my cake pops falling apart?
Dry outer cake layers can cause pops to crumble. Removing that layer and properly mixing in enough frosting helps bind crumbs together. Also, avoid over-handling or rolling too loosely when forming the balls.
PrintChocolate Cake Pops Recipe

Delicious and fun Chocolate Cake Pops featuring moist chocolate cake mixed with chocolate fudge frosting, coated in smooth melted chocolate candy melts, and decorated with white nonpareils. Perfect for parties, celebrations, or as a delightful treat for chocolate lovers.
- Prep Time: 20 minutes
- Cook Time: 35 minutes
- Total Time: 1 hour 30 minutes
- Yield: About 20–24 cake pops 1x
- Category: Dessert
- Method: Baking
- Cuisine: American
Ingredients
Cake:
- 15 oz box chocolate cake mix
- 1/3 cup vegetable oil
- 3 eggs
- 1 1/4 cup water
- 2 tbsp Pillsbury creamy supreme chocolate fudge frosting
Coating and Decoration:
- 12 oz Wilton chocolate candy melts (brown) (1 bag)
- 1 teaspoon melting aid (dipping aid chips)
- 1 bottle white nonpareils
- 1 package cake pop sticks (not specified, typical pack)
Instructions
- Prepare Cake Batter: In a large bowl, combine the chocolate cake mix, 1 1/4 cups water, 1/3 cup vegetable oil, and 3 eggs. Use an electric hand mixer to thoroughly blend the ingredients until smooth and well combined.
- Bake the Cake: Spray a 9×13 inch baking pan with non-stick spray and pour the cake batter evenly into the pan. Bake in a preheated oven at 350 degrees Fahrenheit for 30 to 35 minutes until a toothpick inserted in the center comes out clean.
- Cool and Trim Cake: Once baked, carefully flip the cake onto a cooling rack and allow it to cool completely. Using a knife, remove the outer dry layer of the cake to avoid dryness that can cause the cake pops to fall apart.
- Crumble the Cake: Break the trimmed cake into fine crumbs in a large bowl, ensuring the crumbs are as fine as possible for easier mixing and shaping.
- Combine with Frosting: Add about 2 tablespoons of Pillsbury chocolate fudge frosting to the cake crumbs. Use clean hands to thoroughly mix the frosting into the crumbs until the mixture is moist and holds together.
- Form Cake Balls: Roll the cake crumb mixture into balls approximately the size of a golf ball. Use a cake pop former or meat baller to compress the balls to a uniform size, then hand-roll the balls again to smooth out any weak lines that could cause breakage.
- Melt Candy for Stick Insertion: In a small bowl, melt about 1/4 cup of the chocolate candy melts in the microwave in 10-second intervals until smooth and fully melted.
- Insert Sticks: Dip the end of each cake pop stick into the melted candy and insert it halfway into each cake ball. This helps secure the stick inside the cake pop.
- Freeze to Set: Freeze the cake pops for about 15 minutes to help lock the sticks in place. Do not freeze longer than 15 minutes to avoid chocolate hardening too fast when dipping later.
- Melt Remaining Candy Coating: Melt the rest of the chocolate candy melts in a large bowl, stirring in 1 teaspoon of melting aid (dipping aid chips) to thin the chocolate for easier dipping.
- Dip Cake Pops: Pour the melted candy into a cup for easier dipping. Dip each cake pop straight down into the chocolate and then lift straight up without swirling to prevent detachment from the stick.
- Remove Excess Chocolate and Decorate: Hold the dipped cake pop at a 45-degree angle and gently tap your wrist to let excess coating drip off. Quickly sprinkle white nonpareils over the wet coating, catching any excess in a large bowl below.
- Set Cake Pops: Place the decorated cake pops upright in a styrofoam block to allow the coating to fully set for about 30 minutes at room temperature.
- Serve: Once set, serve the chocolate cake pops at room temperature and enjoy!
Notes
- Removing the dry outer layer of the cake is essential to prevent cake pops from falling apart.
- Using a cake pop former or meat baller ensures uniform size and shape for even coating.
- Adding melting aid helps thin the candy melts for smooth dipping and better coverage.
- Do not freeze cake pops longer than 15 minutes before dipping to avoid chocolate hardening too quickly.
- Handle cake pops gently when dipping to prevent them from falling off the sticks.
- Use a styrofoam block to dry cake pops upright and avoid smudging decoration.
Keywords: chocolate cake pops, cake pops, chocolate candy melts, party dessert, chocolate fudge frosting, easy cake pop recipe