Cute Valentine’s Heart Cake Recipe
Introduction
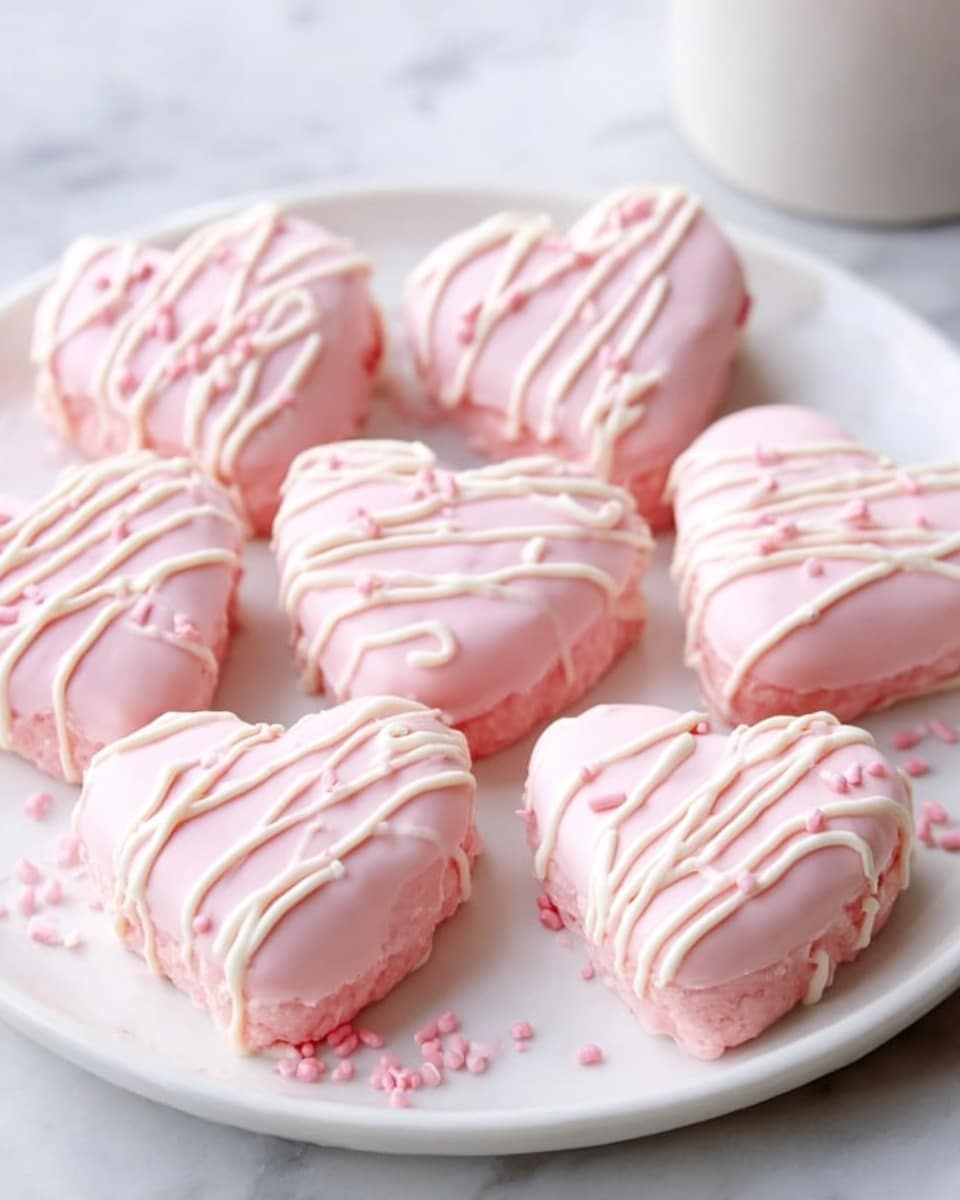
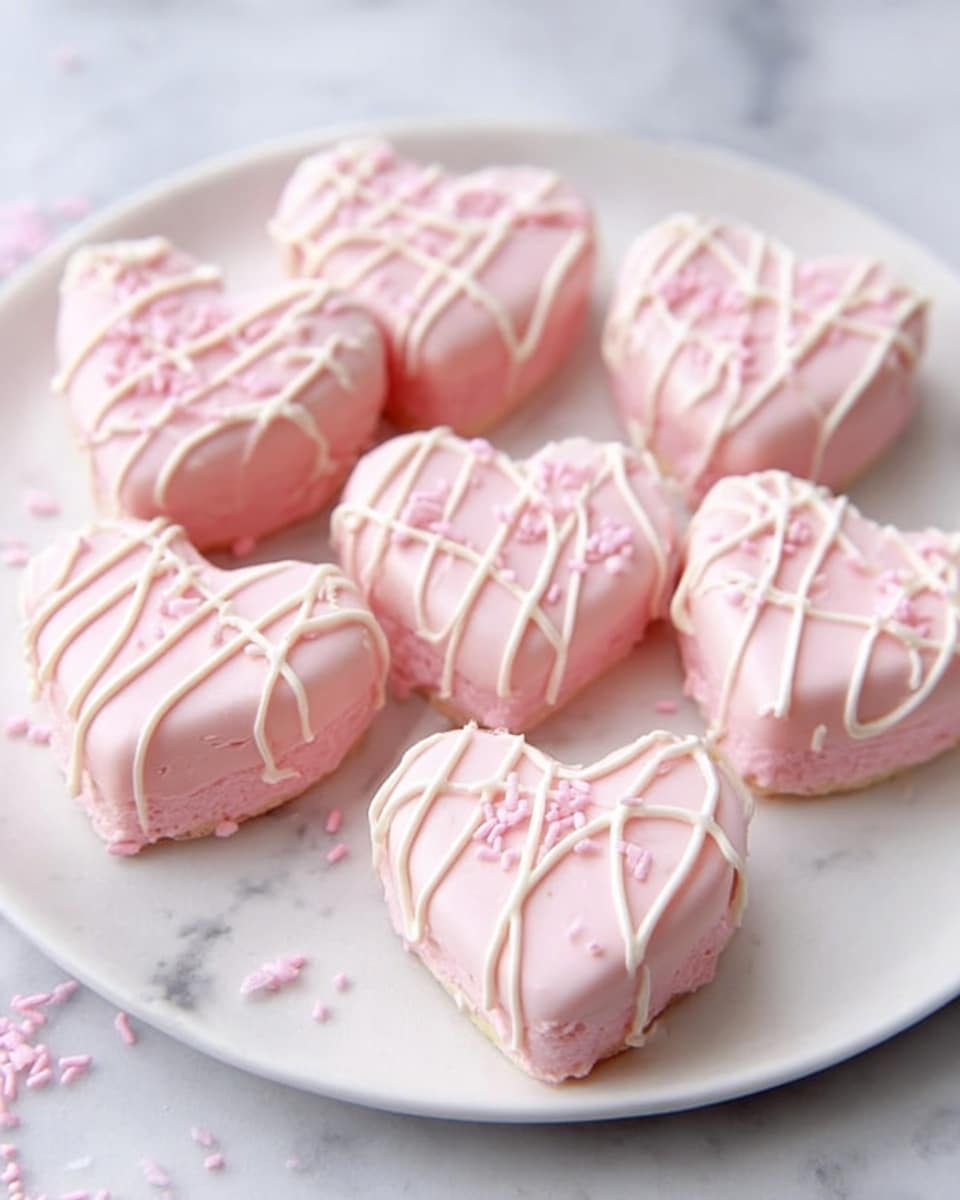
This Cute Valentine’s Heart Cake is a charming and delicious treat perfect for celebrating love and friendship. With tender white cake layers, creamy vanilla filling, and a colorful white chocolate coating, these mini heart-shaped cakes are as fun to make as they are to eat.
Ingredients
- 1 box white cake mix plus eggs, oil, and water as listed on the box
- 1 teaspoon vanilla extract (for extra homemade flavor)
- 1/2 cup unsalted butter, softened (for the filling)
- 1 cup powdered sugar (for the filling)
- 1 teaspoon vanilla extract (for the filling)
- 1–2 tablespoons heavy cream (for the filling)
- 2 cups white chocolate chips or candy melts (for the coating)
- Red or pink gel food coloring
- Sprinkles (optional, for decoration)
Instructions
- Step 1: Preheat your oven to 350°F. Grease a rimmed baking sheet and line it with parchment paper.
- Step 2: Prepare the cake batter according to the box instructions, adding 1 teaspoon of vanilla extract for extra flavor. Pour the batter into the prepared pan, spreading evenly.
- Step 3: Bake for 18–22 minutes or until the center springs back when lightly pressed. Let the cake cool in the pan for 10 minutes, then transfer it to a cooling rack to cool completely.
- Step 4: Once cool, use a heart-shaped cookie cutter to cut out an even number of heart shapes. You will need two hearts for each mini cake.
- Step 5: To make the filling, whip the softened butter until fluffy. Gradually add powdered sugar, vanilla extract, and heavy cream until the mixture is smooth and spreadable.
- Step 6: Spread a layer of the filling on one heart shape and sandwich it with a second heart. Press gently to secure.
- Step 7: Melt the white chocolate chips or candy melts in the microwave in 30-second intervals, stirring until smooth. Add a drop of red or pink gel food coloring and mix well.
- Step 8: Dip each cake sandwich into the melted coating using a fork or spoon to cover completely. Tap off any excess chocolate and place on a rack to set.
- Step 9: Allow the coating to dry completely, about 30 minutes. While still wet, add sprinkles if desired. Finish with a drizzle design of your choice once set.
Tips & Variations
- For a more intense vanilla flavor, add a bit of almond extract along with the vanilla in both the cake and filling.
- Use colored candy melts in pastel shades for a springtime or Easter-themed variation.
- If you don’t have a heart-shaped cutter, a small round or square cutter works just as well.
- To avoid the cakes sliding apart, chill them for 15 minutes before dipping in chocolate coating.
Storage
Store the finished heart cakes in an airtight container at room temperature for up to 3 days. For longer storage, keep them refrigerated for up to 1 week. Before serving, let refrigerated cakes come to room temperature for the best flavor and texture. Avoid freezing, as it may affect the coating’s texture.
How to Serve
Serve this delicious recipe with your favorite sides.
FAQs
Can I make this cake from scratch instead of using a box mix?
Absolutely! A homemade white cake recipe will work beautifully. Just ensure it’s baked in a thin sheet for easy cutting and layering.
What if I don’t have gel food coloring?
You can use liquid food coloring, but gel colors give a more vibrant hue without thinning the chocolate coating. If using liquid, start with a small amount to avoid altering the consistency.
PrintCute Valentine’s Heart Cake Recipe

This Cute Valentine’s Heart Cake recipe offers a charming way to celebrate love with adorable heart-shaped mini cakes. Made from tender white cake layers filled with a smooth vanilla buttercream and coated in colorful white chocolate, these delightful treats are perfect for Valentine’s Day or any romantic occasion.
- Prep Time: 15 minutes
- Cook Time: 22 minutes
- Total Time: 1 hour
- Yield: 12 mini heart cakes 1x
- Category: Dessert
- Method: Baking
- Cuisine: American
Ingredients
For the Cake
- 1 box white cake mix (plus eggs, oil, and water as listed on the box)
- 1 teaspoon vanilla extract
For the Filling
- 1/2 cup unsalted butter, softened
- 1 cup powdered sugar
- 1 teaspoon vanilla extract
- 1–2 tablespoons heavy cream
For the Coating
- 2 cups white chocolate chips or candy melts
- Red or pink gel food coloring
- Sprinkles (optional)
Instructions
- Prepare the Cake Batter: Preheat your oven to 350°F (175°C). Grease a rimmed baking sheet and line it with parchment paper to prevent sticking. Make the white cake batter according to the box instructions, adding 1 teaspoon of vanilla extract for a more homemade flavor. Pour the batter evenly into the prepared pan.
- Bake the Cake: Bake the cake for 18–22 minutes, or until the center springs back when lightly touched. Allow the cake to cool in the pan for 10 minutes, then transfer it to a cooling rack. It’s important not to cut the cake while it’s still warm to maintain clean shapes.
- Cut Heart Shapes: Once the cake is completely cool, use a heart-shaped cookie cutter to punch out even pairs of hearts. Each mini cake will consist of two heart layers sandwiched together.
- Make the Filling: In a bowl, whip 1/2 cup softened unsalted butter until fluffy. Gradually add 1 cup powdered sugar, 1 teaspoon vanilla extract, and 1–2 tablespoons heavy cream until the mixture is smooth and spreadable.
- Assemble Mini Cakes: Spread a layer of the buttercream filling onto one heart cutout, then place a second heart on top to form a sandwich. Gently press together to secure.
- Prepare the Coating: Melt the white chocolate chips or candy melts in the microwave using 30-second intervals, stirring in between until smooth. Add a drop of red or pink gel food coloring to tint the coating to your desired shade and mix well.
- Coat the Cakes: Using a fork, dip each heart sandwich into the melted white chocolate coating, or spoon the coating over the top thoroughly. Tap off the excess coating and place the cakes on a wire rack to set.
- Decorate and Set: Allow the coated cakes to dry completely, about 30 minutes. While still wet, you can decorate with sprinkles if desired. Once dry, add a cute Valentine’s themed drizzle or decoration as you like.
Notes
- Make sure the cake is fully cooled before cutting to prevent crumbling.
- Adjust heavy cream in the filling to achieve your preferred spread consistency.
- If candy melts are unavailable, quality white chocolate chips work perfectly for the coating.
- These mini cakes can be refrigerated for up to 3 days; bring to room temperature before serving for best flavor.
- Use gel food coloring to avoid thinning the chocolate coating.
Keywords: Valentine’s cake, heart-shaped cake, white cake, mini cakes, buttercream filling, white chocolate coating, festive dessert