Easy Mini Birthday Cheesecakes Recipe
Introduction
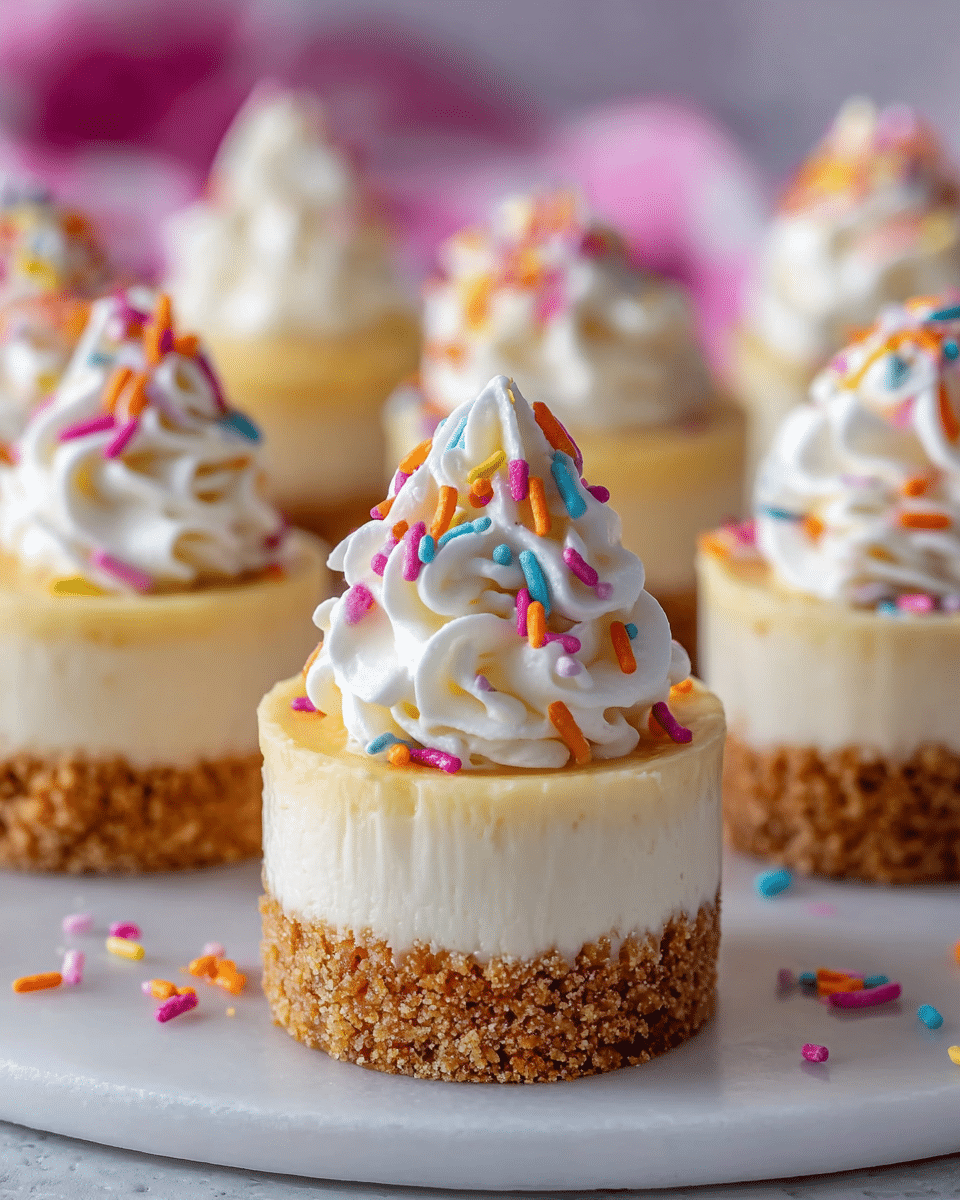
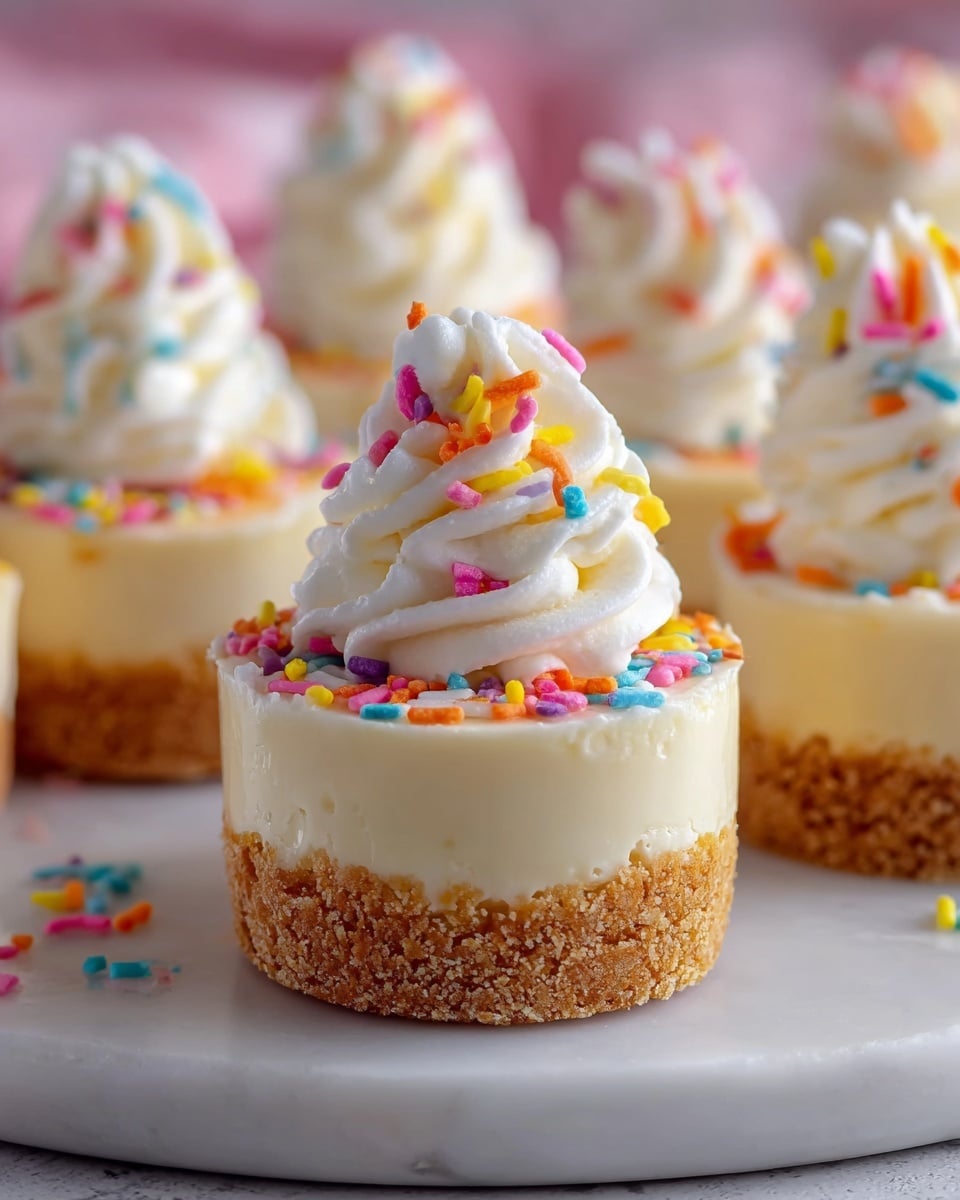
These easy mini birthday cheesecakes are perfect for celebrations or a fun dessert treat. With a buttery nilla wafer crust, creamy filling full of colorful sprinkles, and topped with fluffy whipped cream, they are delightful bite-sized indulgences.
Ingredients
- 1 1/4 cups (about 112g) crushed nilla wafers (approximately a full cup of cookies)
- 3 tablespoons (43g) melted unsalted butter
- 16 ounces (452g) full-fat cream cheese, softened
- 1/3 cup (63g) white sugar
- 2 large eggs, at room temperature
- 1 tablespoon (15ml) pure vanilla extract
- 1/2 cup (120g) sour cream, softened
- 1/3 cup colorful sprinkles
- 1 cup (236ml) heavy cream
- 1/2 cup (65g) confectioners’ sugar
- Extra sprinkles for decoration
Instructions
- Step 1: Preheat your oven to 350°F (175°C). Line a cupcake pan with baking liners to ensure easy removal of the cheesecakes later on.
- Step 2: Grind nilla wafers into fine crumbs using a food processor or blender. Mix these crumbs with melted butter until well combined. Spoon 1 heaping tablespoon of the crust mixture into each cupcake liner, pressing it down with a spoon to form a compact layer. Set aside.
- Step 3: In a mixing bowl, beat cream cheese and sugar until smooth and lump-free, scraping down the bowl as needed. Add sour cream and vanilla extract, mixing until incorporated. Mix in the eggs until batter is smooth. Gently stir in the sprinkles.
- Step 4: Spoon the cheesecake batter into the prepared liners using a large cookie scoop or ¼ cup measuring cup, filling nearly to the top but leaving about ¼-inch space. Sprinkle a few sprinkles on top. Bake for 15-18 minutes, until centers are slightly jiggly. Cool completely before refrigerating for at least 2 hours.
- Step 5: Chill a mixing bowl and whisk attachment for 5-10 minutes. Pour heavy cream into the chilled bowl and beat on medium-high speed until soft peaks form. Gradually add confectioners’ sugar and beat until stiff peaks form. This whipped cream will top the cheesecakes.
- Step 6: Before serving, pipe or spoon whipped cream on each cheesecake. Decorate with extra sprinkles or fresh fruit if desired. Store leftovers in an airtight container in the refrigerator.
Tips & Variations
- Use colorful sprinkles inside the batter and on top for festive appearance and a fun texture.
- For a citrus twist, add a teaspoon of lemon or orange zest to the cheesecake filling.
- Swap sour cream for Greek yogurt for a tangier flavor and lighter texture.
- Make these mini cheesecakes a day ahead to allow flavors to fully develop.
- Use gluten-free cookies if you need a gluten-free dessert option.
Storage
Store leftover cheesecakes in an airtight container in the refrigerator for up to 3 days. The whipped cream topping is best added fresh before serving, but you can keep the cheesecakes chilled and add whipped cream just prior to eating. For best texture, consume within 2-3 days.
How to Serve
Serve this delicious recipe with your favorite sides.
FAQs
Can I make these cheesecakes ahead of time?
Yes, these mini cheesecakes can be prepared up to 24 hours in advance. Bake and chill them ahead, then add whipped cream just before serving to keep it fresh.
What can I use instead of nilla wafers for the crust?
You can substitute graham crackers, digestive biscuits, or any crunchy cookie you prefer. Just crush them finely and mix with melted butter as directed.
PrintEasy Mini Birthday Cheesecakes Recipe

These Easy Mini Birthday Cheesecakes are delightful individual-sized desserts featuring a crunchy Nilla wafer crust, a creamy and colorful sprinkle-studded cheesecake filling, and topped with fluffy homemade whipped cream. Perfect for celebrations or a sweet treat, these mini cheesecakes are simple to prepare and bake, then chilled for a creamy finish.
- Prep Time: 15 minutes
- Cook Time: 18 minutes
- Total Time: 2 hours 33 minutes
- Yield: 12 mini cheesecakes 1x
- Category: Dessert
- Method: Baking
- Cuisine: American
Ingredients
Crust
- 1 1/4 cups (about 112g) crushed Nilla wafers (approximately a full cup of cookies)
- 3 tablespoons (43g) melted unsalted butter
Cheesecake Filling
- 16 ounces (452g) full-fat cream cheese, softened
- 1/3 cup (63g) white sugar
- 2 large eggs, at room temperature
- 1 tablespoon (15ml) pure vanilla extract
- 1/2 cup (120g) sour cream, softened
- 1/3 cup colorful sprinkles
Whipped Cream Topping
- 1 cup (236ml) heavy cream
- 1/2 cup (65g) confectioners’ sugar
- Extra sprinkles for decoration
Instructions
- Prepare the Oven and Cupcake Liners: Preheat your oven to 350°F (175°C). Line a cupcake pan with baking liners to ensure easy removal of the cheesecakes later on.
- Create the Crust: Grind Nilla Wafers into a fine crumb using a food processor or blender. Mix these crumbs with melted butter until well combined. Spoon 1 heaping tablespoon of the crust mixture into each cupcake liner, pressing it down firmly to form a compact layer. Set aside while you prepare the filling.
- Make the Cheesecake Filling: In a mixing bowl, beat together the softened cream cheese and white sugar until smooth and free from lumps, scraping down the bowl as needed. Add the sour cream and vanilla extract, beating until well incorporated. Mix in the eggs until the batter is smooth and fully combined. Gently stir in the colorful sprinkles to add a fun splash of color.
- Fill and Bake the Cheesecakes: Using a large cookie scoop or ¼ cup measuring cup, spoon the cheesecake batter into the prepared cupcake liners, filling each nearly to the top but leaving a ¼-inch gap. Sprinkle a few extra sprinkles on top for decoration. Bake in the oven for 15 to 18 minutes until the centers are slightly jiggly. Remove from oven and allow to cool completely. Refrigerate the cheesecakes to chill for at least 2 hours before serving.
- Prepare the Whipped Cream: Chill your mixing bowl and whisk attachment in the freezer for 5 to 10 minutes. Pour the heavy cream into the chilled bowl and beat on medium-high speed with an electric mixer until soft peaks form. Gradually add the confectioners’ sugar, then continue beating on high speed until stiff peaks form. This whipped cream will be used to top the chilled cheesecakes.
- Serve and Enjoy: Before serving, pipe or spoon the whipped cream onto each chilled mini cheesecake. Garnish with additional sprinkles or fresh fruit if desired. Store any leftovers in an airtight container in the refrigerator.
Notes
- Ensure all dairy ingredients like cream cheese and sour cream are softened to room temperature for a smooth batter.
- Do not overbake; the cheesecake centers should remain slightly jiggly for a creamy texture.
- Chilling the mini cheesecakes for at least 2 hours helps them set perfectly and enhances flavor.
- Use colorful sprinkles inside and on top for a festive birthday look.
- Whipped cream topping can be prepared ahead and stored refrigerated until ready to use.
Keywords: mini cheesecakes, birthday dessert, cheesecake recipe, individual cheesecakes, party dessert, no-bake crust, sprinkles cheesecake