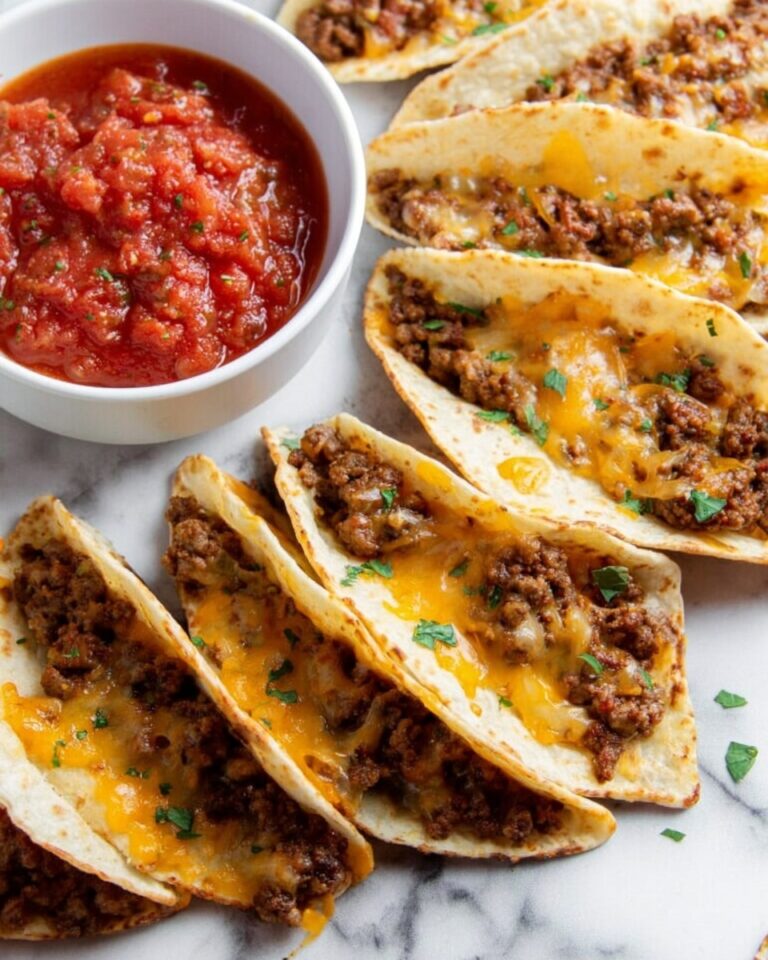
Mini Baked Chicken Tacos Recipe
Introduction
Mini tacos are a fun and delicious way to enjoy a classic favorite in bite-sized form. These crispy, cheesy treats are perfect for parties, snacks, or a light meal.

Ingredients
- 1 lb. cooked shredded seasoned chicken breast (3-4 cups shredded chicken breast, see notes for cooking options)
- 8 oz. shredded colby jack cheese
- 20-24 street taco corn tortillas
- Olive oil or cooking spray
- Sour cream, for serving
- Salsa, for serving
- Fresh chopped cilantro, for garnish
Instructions
- Step 1: Preheat the oven to 425 degrees Fahrenheit.
- Step 2: Arrange the tortillas on a baking sheet in a single layer.
- Step 3: Brush or spray both sides of each tortilla with olive oil.
- Step 4: Place a heaping tablespoon of the shredded chicken mixture on each tortilla, then top with a heaping tablespoon of shredded cheese. Use a second baking sheet if needed to avoid overcrowding.
- Step 5: Bake the tacos for about 2 minutes, until the cheese begins to melt. Carefully fold each tortilla in half, pressing gently to form a taco shape.
- Step 6: Return the folded tacos to the oven and bake for another 12-15 minutes, or until the tortillas are crispy on the outside.
- Step 7: Serve the mini tacos warm with sour cream, salsa, and fresh chopped cilantro. Enjoy!
Tips & Variations
- For extra flavor, season the shredded chicken with your favorite taco spices before assembling.
- Swap colby jack cheese for cheddar or Monterey jack for a different taste.
- Use small flour tortillas if you prefer a softer taco shell, though corn tortillas will yield crispier results.
Storage
Store leftover mini tacos in an airtight container in the refrigerator for up to 3 days. To reheat, bake in a preheated oven at 350 degrees for about 8-10 minutes to maintain crispiness, or microwave briefly if preferred.
How to Serve

Serve this delicious recipe with your favorite sides.
FAQs
Can I prepare these mini tacos ahead of time?
You can assemble the tacos without baking and keep them refrigerated for a few hours before baking. This is handy for parties or meal prep.
What can I use if I don’t have shredded chicken?
Try cooked shredded beef, ground beef, or even sautéed vegetables as tasty alternatives to shredded chicken.
PrintMini Baked Chicken Tacos Recipe

These Mini Tacos feature tender shredded chicken and melted colby jack cheese baked within crispy corn tortillas, making for a delightful bite-sized snack or appetizer. Ready in under 30 minutes, they’re perfect for parties or a fun family dinner served with sour cream, salsa, and fresh cilantro.
- Prep Time: 10 minutes
- Cook Time: 20 minutes
- Total Time: 30 minutes
- Yield: 20–24 mini tacos 1x
- Category: Appetizer
- Method: Baking
- Cuisine: Mexican
Ingredients
Chicken Filling
- 1 lb. cooked shredded seasoned chicken breast (about 3–4 cups)
Cheese
- 8 oz. shredded colby jack cheese
Tortillas
- 20–24 street taco corn tortillas
- Olive oil or cooking spray
Toppings
- Sour cream
- Salsa
- Fresh chopped cilantro
Instructions
- Preheat the oven. Set your oven to 425°F (220°C) and allow it to fully preheat to ensure even baking throughout the process.
- Prepare tortillas. Arrange the corn tortillas in a single layer on a baking sheet. Depending on your sheet size, you may need to use two sheets to avoid overlapping.
- Oil the tortillas. Brush or spray both sides of each tortilla lightly with olive oil or cooking spray to help them crisp up in the oven.
- Add the filling. Place about a heaping tablespoon of shredded seasoned chicken on each tortilla, then sprinkle a heaping tablespoon of shredded colby jack cheese on top of the chicken.
- Initial bake to melt cheese. Bake in the preheated oven for 2 minutes, just until the cheese starts to melt and the tortillas are warm enough to fold.
- Fold the tacos. Carefully remove the tortillas from the oven and gently fold each in half, pressing gently so they hold their taco shape without breaking.
- Crisp the tacos. Return the folded tacos to the baking sheet and bake for an additional 12 to 15 minutes, or until the corn tortillas are crispy on the outside and golden brown.
- Serve with toppings. Remove from oven and serve warm topped with sour cream, salsa, and fresh chopped cilantro to taste. Enjoy your mini tacos!
Notes
- For cooking the chicken breast, you can bake, poach, or slow cook it until fully cooked before shredding and seasoning to your preferred flavor.
- Using street taco-sized corn tortillas is essential for the perfect mini size and authentic flavor.
- Carefully folding the tortillas after the initial short bake helps prevent cracking and ensures an even crisp texture.
- Feel free to customize toppings with avocado, chopped onions, or a squeeze of lime for extra flavor.
Keywords: mini tacos, shredded chicken tacos, street tacos, easy appetizers, Mexican snacks, baked tacos